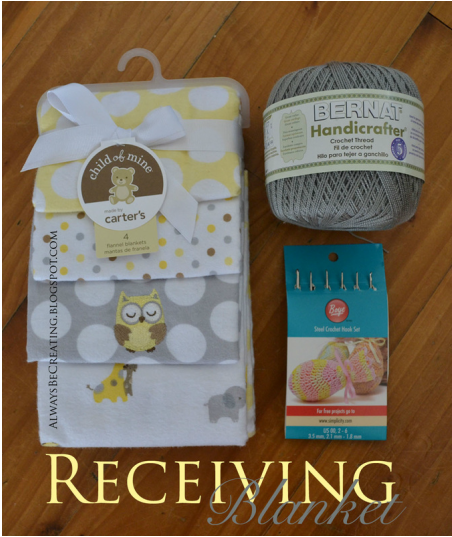
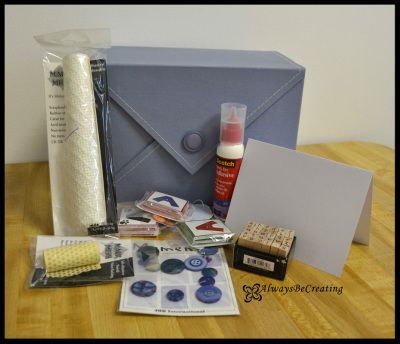
49Fifty
  • Home
  • Photo Gallery
  • 2015 Project
  • 2014 Project
  • Blog

Receiving Blanket With A Crocheted Edge

6/1/2015

0 Comments

 
MATERIALS/SUPPLIES
Package of Flannel Receiving Blankets
Crochet Thread
Crochet Hook size 4/2.00mm
Grip Handle. My MIL uses this comfort cushion. I haven't found it out here where I am but found it online.
To start off this year's 49Fifty project I wanted to share a few of the fun receiving blankets that my mother-in-law gave us when Little Miss E. joined our family last spring.

These are the perfect blanket for a spring or summer baby. The cute little crocheted edge gives it some personality without being too over baring. You can wrap up your little one without worrying that they'll get too hot as they are swaddled. These little blankets don't take up your whole diaper bag and are great for travel. We know because we drove from Connecticut to Utah last spring. These blankets were great for placing over the baby in her car seat or to wrap her up when we needed to get out at rest stops and stretch our legs.
Picture
Picture
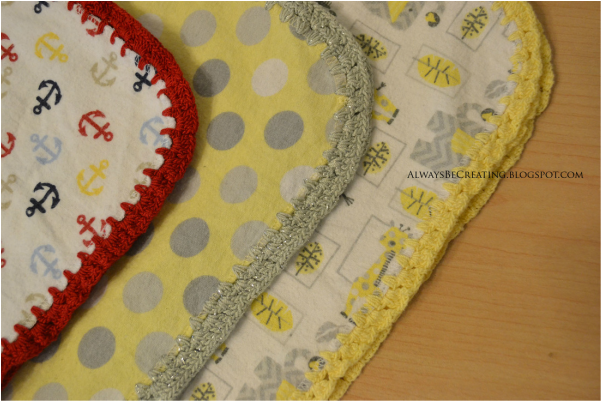
These flannel blankets work great. They are the right size and already finished with a serged edge.
Picture
INSTRUCTIONS
Place the grip on your hook, if you are going to use one.

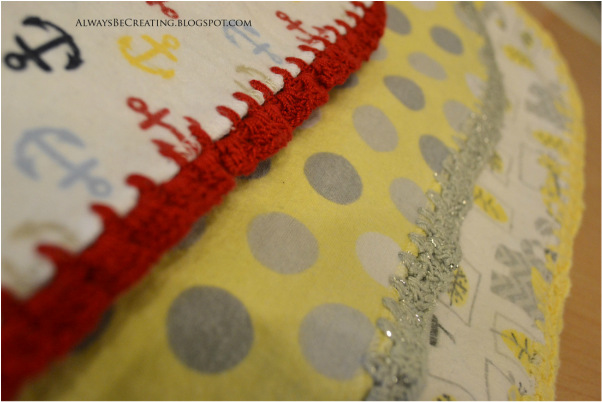
Use the hook to first poke holes around the blanket, just inside the surge stitch, about 1/4" apart. It does not need to be perfect but I do like to keep a ruler out in front of me so that I have a visual reference to look at every once in a while. You might also use the ruler and a quilting marker to mark every 1/4" and stay perfectly spaced.

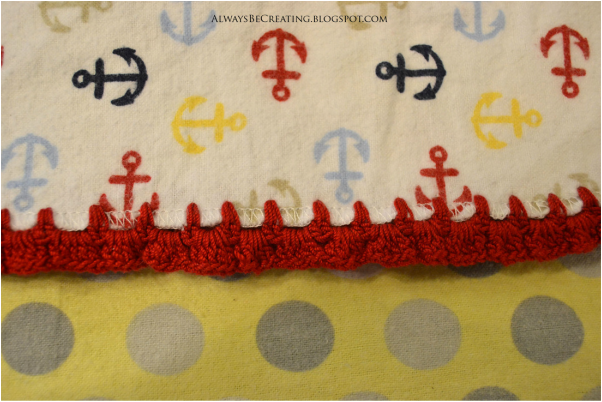
Row one: SC* in hole you choose to start at. CH 3-5**, repeat until you have gone all the way around. SLST to connect. CH 2

Rowtwo: 4DC*** in space created from CH's in previous row.

*I start at a spot about 1/3 of the way down one side, that way its not centered or on a corner where it will be noticeable but it is easier to blend in.
**The number of ST needed for the chain will depend on how far apart you spaced your holes around the edge of the blanket.
***As a rule I use as many DC's in Row two as I used CH's in Row one. But this is where you can add variation and fun. The more DC's added to each CH section, the trim will have a ruffle look. You can do a scalloped edge with a pattern something like {Remove 2 CH from end of Row one. Round two: in Previous row CH section add SC, DC, TR, DC, SC, SLST in top of SC from previous row, repeat. SLST to connect at end}.
Picture
My MIL is super fast at making these, me....not so much. But this is a great project to work on in the evening while watching TV or in longer car rides.


I would love to hear from you and see your projects. Leave a comment or #AlwaysCreate on your photos. Find me on Instagram {
@AlwaysCreate} and follow along for behind the scenes and fun little extras.
0 Comments

Baby Shower ~ Thoughts For The New Mom

17/9/2014

0 Comments

 
Packing up and moving in the Spring happend fast with everything else we had going on. One of my goals was to go through all of our boxes and get rid of things we didn't need/want and make sure we were not wasting space by packing a bunch of air. After moving so many times I stopped worrying about trying to open every box when we moved in some place new, it was also hard because we seemed to keep moving into places that were smaller than the last.

Well we moved into the biggest place we have ever been in, a cute little farm house a couple miles away from the University where Paul is teaching. The goal was to open every box and make sure we weren't holding onto un-needed items.

In doing so I came across this cute little card full of thoughts and advice from the family and friends at my baby shower for Lady A {there are some cute ones for Miss E as well but I put those in a safe spot, you know, so they won't get lost or ruined, and now I just need to remember where that was. Am I the only one that does that?}. 
Picture
Even since I did not make it I thought I would try to put together a list of supplies and tools needed to create this.

MATERIALS/SUPPLIES
Solid and Patterened Card Stock
4"x6" Picture sleeves like the ones here or click the link for different sizes.
Decorative Brads
Decorative Embelishments
Archival pens like these ones

TOOLS
Paper cuter {this is the one I use. It travels well and is great for projects that require simple straight cuts}
Small Hole punch/needle {pretty much anything that will help puncture the layers of paper and page sleeves so the brads can be placed}
Glue/Double Sided Tape
Picture
It is such a cute idea and full of great advise from people I love, that I wanted to share with you. My SIL put this together ... I do love that there are so many wonderfully creative people in my life.
Picture
I hope you enjoy and that it inspires you on your journey to create.
Picture
I would love to hear from you and see your projects. Leave a comment or #AlwaysCreate on your photos. Find me on Instagram {@AlwaysCreate} and follow along for behind the scenes and fun little extras.
0 Comments

Baby Shower Thank Yous

16/4/2014

0 Comments

 
The ladies at church threw me a baby shower a couple weekends ago and they did such a great job. The colors for Lady #2 are yellow, grey and purple, I also decided to go with an elephant theme. I posted about the invitations here and check out these cute little party favors. That night I didn't have my camera and honestly, even if I did, there probably still would not be any photos {moving around, up and down, oh that sounds so miserable}.
Picture
At the end of the night I even took home some of the balloons for Lady A. When she came down the next morning she had such a look of excitement on face. We haven't really done balloons too much before and now she had these ones all to herself.

While l am trying to stay on top of my 49Fifty projects, it is getting harder and harder to keep up with writing about them all. It seems every time I sit down, in just a matter of minutes l am asleep. I can not wait to meet Lady #2, but I am also excited to able to sleep in my bed, get on the floor and play with my girls, all those wonderful things I used to be able to do before my body went wonky from this pregnancy.

Now it is time to make Thank You cards for all these wonderful ladies. Have I ever mentioned how much I love having my own personal cutting machine. Normally I like to create my own designs but right now l am looking for easy and fast. There is too much going on right now: Baby, packing, moving and an extremely sore body from the pregnancy. I found the best shape from the Silhouette online store, then took it into the Studio program and changed it a little to create my card shape.

I have a bunch of envelopes already so the only thing I really had to keep track of was making sure to size the cards to fit them.
Picture
Do you ever have those projects that while you are working on them you wonder the whole time if they will actually turn out. Then when you are done you could not be more pleased with them?

This was one of those for me. I love how they turned out and am so excited to give them to all those who have helped us get ready for Lady #2.
0 Comments

A Baby Shower for Me!

29/3/2014

0 Comments

 
My church family is the best. One thing they love to do is get together, and a baby shower is a wonderful reason for us to all hangout. I have been to more baby showers in the short time we have lived here than the rest of my life combined. The games are hilarious and there are a couple of us who are a bit competitive ~ always a good time.

This past week has been  crazy. Paul was out of town and I am just over 36 weeks. My body has not enjoyed this pregnancy and I have been sleeping in the recliner for the last 3-4 weeks. I have been falling asleep every time I sit down so I did not think I was going to get a card up this week.

Tonight {Saturday} we had a dinner before the Women's Conference {Lady A and I went for the dinner part but went home for the conference because it was too late to keep her up} with the ladies from church. I was handed an invitation to my own baby shower next weekend. YEA!!! There were four of us due within about six weeks of each other and I am the last one. We will also be moving shortly after and since I have tried to make it to every baby shower possible, I am super excited for one last get together with these ladies before we leave.

I have pinned a couple of items or shared some things on FB and these cards are perfect. For Lady A we did owls and for Lady #2 we want to do elephants and I will continue with the yellow and grey color scheme, I used them in the afghan I recently finished. Since this invitation was made on my behalf, and because I think it is so cute, I am counting it as my card for this week.
Picture
0 Comments

Baby Shower Card {Girl}

20/3/2014

2 Comments

 
There is another baby shower this weekend, so guess what this card is for. A little girl baby shower!

I have loved the yellow and grey combination for years now. Both of my girls have afghans using those colors and if there is ever a baby number three, you can bet their afghan will have those colors in them too.

Starburst Afghan
Tulip Afghan

Have you noticed over the past few weeks/months that the shape of the moment is the honeycomb. {OK, even typing that has me thinking of Honeycomb cereal and now I am hungry.}  I love this shape and there seems to be an endless number of ways it can be used. Here is my simple card using the honeycomb as my inspiration.

I created the shapes in Adobe Illustrator and imported the file to my Silhouette Studio. BAM!! Shapes are cut just as fast as that and away we go creating the card.
Picture
Picture
2 Comments

Baby Shower Cards {Boys}

13/3/2014

0 Comments

 
'Tis the season for baby showers. These next few months the weekends will be full for me and it seems like half of them will be baby showers. Not that I mind, it is a great reason to get together with friends, play some games, eat yummy treats and let the dads take the kiddos for a bit.

This week I got out my trusty card kit and a few extra embellishments to sit down and put some cards together.
Picture
The card kit had a baby card packet but I have no idea where the instructions are so I put them together however I wanted. At first I was just going with the idea to get them done and move on. But after placing the simple pieces down that came in the kit I decided that I needed to add just a little something extra to help give them a personal touch.

With just a couple of simple extra touches I love how the cards turned out and am excited to give them out. Now to just find the perfect gifts to go with them.
Picture
0 Comments

    Author

    Write something about yourself. No need to be fancy, just an overview.

    Archives

    January 2015
    October 2014
    April 2014
    March 2014
    February 2014
    January 2014

    Categories

    All
    2014
    Baby
    Bathroom
    Cards
    Carpet
    Cleaning Tips
    Cleaning Tips
    Crayon
    Family
    Floor
    Glass
    Happy Birthday
    Holiday
    Homemade Cleaning Solution
    Invitations
    Kitchen
    Nail Polish
    Review
    Sink
    Thank You
    Thinking Of You
    Toys
    Valentine
    Window

    RSS Feed


Powered by Create your own unique website with customizable templates.