49Fifty
  • Home
  • Photo Gallery
  • 2015 Project
  • 2014 Project
  • Blog

Removing Stickers From The Kitchen Floor

10/4/2014

0 Comments

 
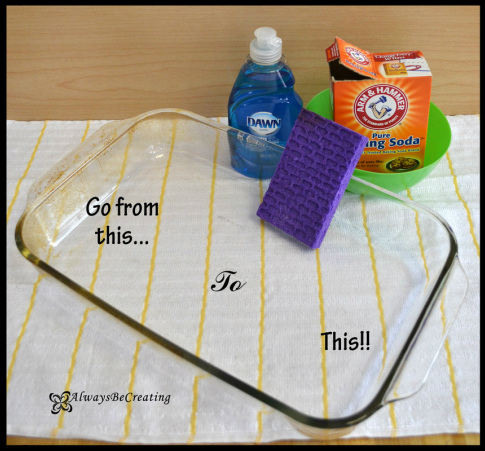
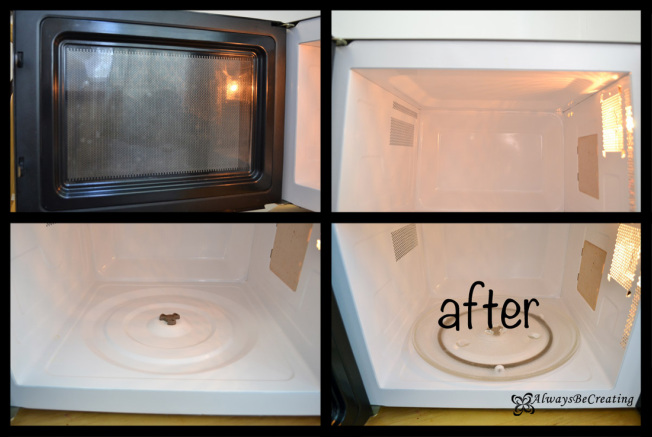
Today you will find me on the kitchen floor. The other day while Paul was out of town I was trying to get dinner ready and Lady A decided to get her stickers out. They are all over the kitchen floor now. Being as sore and as pregnant as I am ~ I decided to let her and just clean them up later, that was not a battle I wanted to fight at the time. Today I decided to figure out how hard it is going to be clean them all up so I sat down with some of my favorite cleaning friends and went to town.
Picture
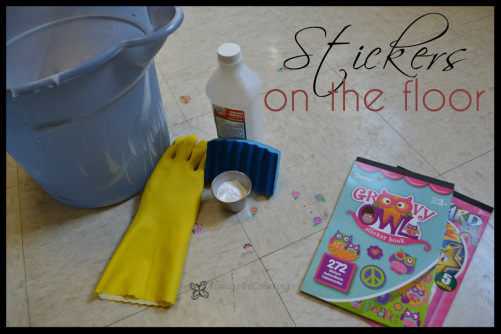
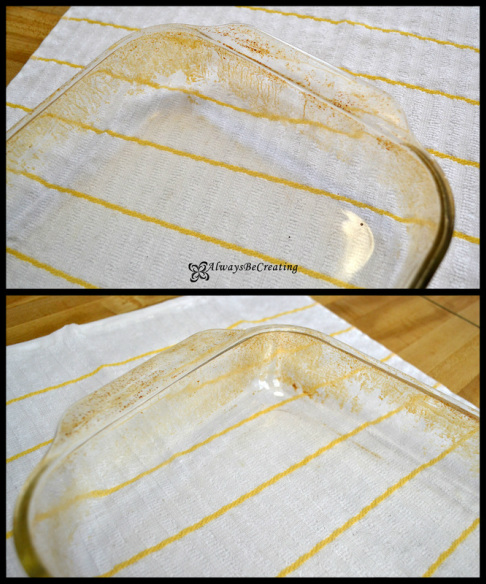
There were two types of stickers 1: paper ones that left paper after trying to peal them up and 2: plastic ones where the entire sticker came up but left all of the sticky residue behind.

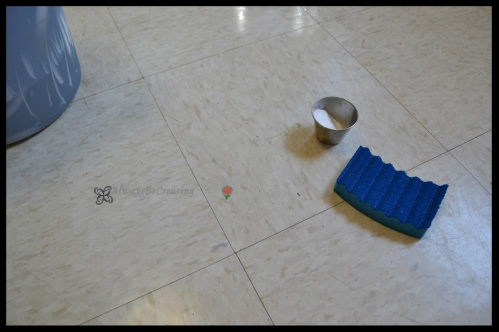
First peal up the stickers and get as much off as you can.
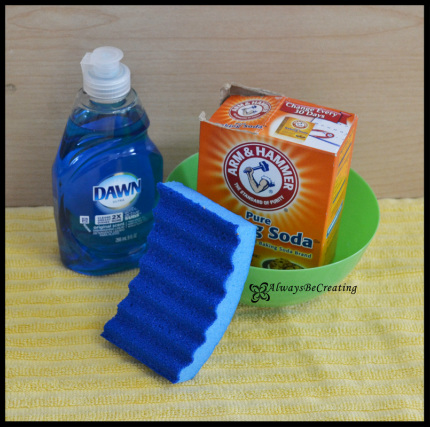
Then sprinkle some baking soda over the left behind gunk.
Dip your scrubber sponge in the hot water and ring it out then start scrubbing.

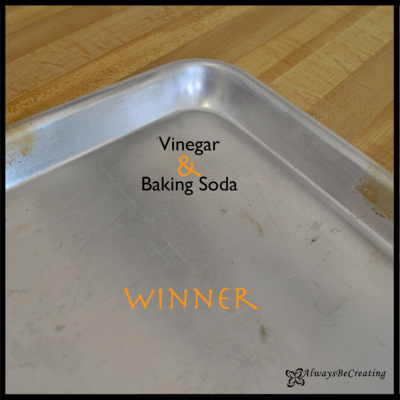
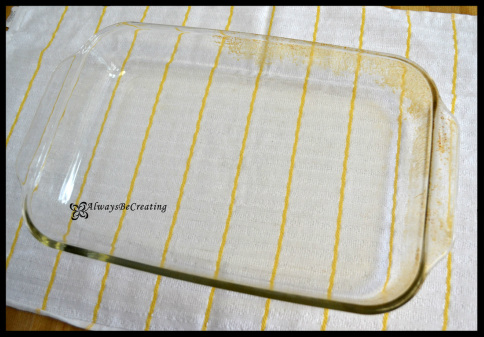
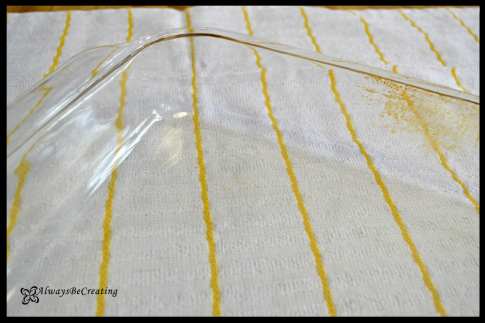
This took very little effort, I was so happy. It also got these apartment floors cleaner than I have ever seen them. Now I'll have to figure out a way to get the rest of the floor to clean up that nicely {hopefully without having to sit on the floor with a box of baking soda and a small scrubber sponge}. I'll leave that for another day, one where I am not 38 weeks pregnant and can't bend or move.
Picture
The reason I think this worked is because the baking soda acts as a scrubbing agent to get the rest of the paper residue that is left behind. It also seemed like it helped to lift the sticky residue because it would ball up and wipe away.

Tip: There were stickers under my bucket of hot water as well. Once I moved the bucket after taking the photo the stickers under it were damp from the humidity and steam coming from the bottom of the bucket. When I pealed those stickers up most of the paper and sticky backing came up on the first swipe of my thumb nail. If you have a steam mop I would suggest trying that first.
0 Comments

Methods for Cleaning a Clogged Drain

3/4/2014

0 Comments

 
We all get them....Clogged sinks!!

I do not know about you but it drives me crazy when I got to wash my face and see the sink start to fill up when I turn the water on but the pug is not in the sink. Blah!

Many different things can contribute to a clogged sink: whiskers, soap, toothpaste, the list goes on. I have also noticed, now that our little one is really into brushing her teeth, that the bathroom sink clogs a lot more often. My guess is that it is all that extra toothpaste going down the drain. Once again it is time to clean them out. There are a couple of different remedies you can try that will not cost you nearly as much as calling someone into your home or using harsh chemicals around  your house. We all know right now I am all about no chemical cleaning while I am pregnant.

Sorry, there are no photos. This was a hard one to photograph but I figured there were plenty of people out there looking for home remedies for clogged drains so I am posting it without photos.
Method one:
If you have ever gone to a Science Fair you have seen the exploding volcano that so many kids like to do. Well, that same science can go into unclogging your drain. Pour 1/2 cup of dry baking soda down the drain followed by 1/2 cup of white vinegar. I cover mine so that the reaction works faster instead of letting the air escape. If you do that it should just take a few minutes, otherwise let the baking soda and vinegar sit for about a half hour. Then pour boiling water down the drain to help 'wash' away the gunk.

It is no secret that baking soda and vinegar have been my new best friends on this cleaning crusade of mine so this is the one that I went with and it worked great.


Note: if you have plastic pipes just use tap water at its hottest setting. Using boiling water could melt the plastic pipes.

Method two:
I am not a Coke or Pepsi drinker and after reading what some have said about how well they can be used for cleaning, I do not think I will ever drink these. BUT....They can be used on clogs, lime scale and other hard to clean build up spots.

Get a two liter of coke and let it sit out until it reaches room temperature. Pour it down the drain and let the corrosive abilities do their thing. After about an hour or two run hot water to wash out the pipes.
The acid and fizz of the soda work to break down the buildup.

Source

Method three:
Plunger. That's right, your trusty plunger that is sitting next to your toilet. I know, the thought of putting that in my sink grosses me out too, but it can work. There are also smaller plungers out there made more specifically for sinks and tubs. There are a couple of tricks to using a plunger. First, make sure there is water in your sink or tub. Second, make sure there is water in the bulb of the plunger. This way all your energy will go straight to the clog when you use it. If it is full of air you won't be getting the full force of the plunger on the clog.

Note: Be warned, this one can get messy.


Method four:
Your trusty wire hanger. Yep, just untwist it and put the hook part down the drain. This will work if the clog is towards the front of the pipes before the goose neck {'U' shape} part of the pipes, the part you see right under your sink.

If the clog is too much for any or all of these by all means call a professional.

0 Comments

Cleaning the Gunk off of Cookie Sheets

20/3/2014

0 Comments

 
I have gotten some e-mails and comments from others about suggestions on things they use for getting after some of those hard to clean items. One item was Bar Keepers Friend.
I have fiends who use this and swear by it too. While I was walking down the cleaning isle at the store the other day I spotted it and decided to pick some up to try. The last few main cooking/baking dishes that are left to clean right now are the cookie sheets. 
Picture
Um...gross! Does anyone else have cookie sheets that look like this or is it just me?
To help the process along I decided to soak the cookie sheet in hot soapy water like I had done with the glass baking dishes and pots. Using the same technique, I poured Bar Keepers Friend on the cookie sheet and went to town. The cookie sheet was getting really scuffed so I turned the sponge around used the soft side but that did no good. Can you see in the photo how the the sheet has gone dull and scuffed? Well, that is not what I wanted. When I run my fingers over this spot I can totally feel a difference in the finish of the sheet. I am now worried that I ruined it.
Picture
Back to the new 'go to'...baking soda and a sponge. This was working just as well at getting the gunk off the cookie sheet but was not leaving it all scuffed up.

To try and help this cleaning process go a bit faster I decided to soak the cookie sheet in hot, soapy water and poured some vinegar in the water as well. After soaking for about an hour I went back at it. So much better! Remember, it is better to use the baking soda as a paste. Ring out the sponge as much as possible, pour the baking soda on the sheet then go to town. The corners are still a bit tough so I did end up using the scrubbing side of the sponge to get the last bit of stubborn gunk off.
Picture
With all this cleaning going on in my kitchen I just might be more excited to cook. {After the baby is born}
0 Comments

Cleaning The Burnt Gunk Off A Stainless Steel Pan

6/3/2014

2 Comments

 
Last week after cleaning the glass baking dishes my husband asked me to try cleaning his stainless steel pans. He does most of the cooking in our home. He loves it and finds it relaxing after long days at work and school.

The other day he tried a frozen Chinese dinner and cooked it according to the instructions. Paul said while he was cooking it, he was not sure the instructions were going to work out and he was right. The bottom of the pan is covered in black burned on gunk. Just terrible! This was about two weeks ago and Paul has been soaking the pan and washing it every time he has done the dishes {that is right ladies...he cooks and does the dishes!!!}.

We have two pans, the first is a cheap one we got when we were first married, the other is part of a better set  of pots and pans my parents got us.
Picture
Here is what you need
Picture
Here is the first one. See....the pan is in bad shape. I was not kidding you.

First thing I went ahead and tried the same technique I used on the glass baking dishes. It worked ok on the underneath part of the pan but it had hardly touched the stuff on the inside. When Paul came in the kitchen and saw me going at this pan he told me that the only thing he found that was working was to take a butter knife and scrape it. That would take forever and make my skin crawl every time it scraped on the pan.

Then I remembered we had a Lysol Scrubber Sponge, this has a really tough scrubber on one side. A simple switch of the sponges and we were in business. My back was not going to let me stand much longer so Paul went to town with the sponge and baking soda.
Picture
Pan number two: As a side note my parents are so funny. They were on this kick of watching Americas Test Kitchen and they recommended a brand of pans. I can not remember all the reasons my parents said these were on the top of the list but they were and so my parents wanted to get all of their married kids a set. This particular set was on sale and going to be discontinued because a new style was coming out so my parents were on the hunt. They went to 5 different stores to get four sets. Once the first gift was opened on Christmas morning, the rest of us knew what we were getting!!

The dishes clean up really nice but this one {the one Paul uses the most} is starting to get some build up on the outside where grease has spilled over then been cooked on the outside. Once we pulled out the scrubber sponge this one started to clean up really well which Paul was happy to see, after all, it is his favorite pan.

I am not going to write out all the steps, just hope over to the instructions for cleaning a glass baking dish and follow that. Here are a couple of tips for cleaning the stainless steel pans.
  • Use a scrubber sponge along with the baking soda
  • Scrub in a circular motion, it makes a huge difference instead of just going back and forth

We were working against nap time and loosing the sun to take some photos, so the pans are not done yet but one more soak and scrub during nap time and they will look like new!
Linked up here:
Whimsy Wednesday @ SimplyDesigning.net
Link Party Palooza @  I Heart Nap Time
Tip Me Tuesday @ TipJunkie.com
Made by You Mondays @ SkipToMyLou.org
Inspire Me Wednesday @ 733blog.com
The Party Bunch @ ThirtyHandMadeDays.com
2 Comments

Cleaning the Gunk off of a Glass Baking Dish

27/2/2014

2 Comments

 
This is one I have wanted to tackle for a while but at the same time was afraid to, thinking that there was no hope and it was going to take hours of scrubbing no matter what I tried. But there have been a number of posts floating around Facebook and Pinterest about people getting their baking dishes clean, so I thought I would finally give it a try.

Of course when it came time to do my research I could not seem to find all those wonderful posts. So I turned to Google....hurray for Google! After reading a couple of threads and putting together what I have learned so far this year on my crusade to clean, I came up with a plan.
Here are ALL the items I used
Gross baking dish
Hot water
Dawn {the blue stuff}
Baking soda
Bowl
Sponge
Picture
Picture
Here is a close up so you can see just how bad this dish really is.
Turn on the faucet to the hottest water temperature you can, put some dish soap in to make it nice and sudsy {is that even a word} then let the dish sit and soak. I was only planning on an 30 minutes to an hour but our morning plans changed a bit so it soaked about 2 hours. It worked out fine because the water was so hot to begin with it stayed pretty hot by the time I got around to cleaning.

Now, pour some baking soda into a bowl so you can use it for dipping your sponge into. Get the sponge wet then ring it out, you just want it wet enough that the baking soda will stick to it when it is dipped in the bowl.

Go to town scrubbing!!!! Rinse off the dish every once in a while so you can see where to keep working on. I just used the soapy water that was already in the sink. No need to be wasteful. As I kept getting closer and closer looking at my dish in amazement as it came clean so easily, the thought came to me that I was happy this was working so well and I did not have to worry about breathing in any harsh chemicals.

A couple of tips:
The more paste like the baking soda is, the better it will scrub clean the dish. When you pull the dish out of the sink let as much water drip off as you can {no need to use a towel and dry it} and be sure to squeeze the water out of the sponge when you rinse it out.

Our sink is pretty small so only half of the baking dish could fit in and soak at a time. With the dish that was not as bad I went ahead and cleaned the whole thing. There was a bit of a difference in how much elbow grease was needed to clean the side that had not soaked. It still worked but took a bit of extra time. On my really bad dish, I gave up and will let it soak first.

We do not have a dish washer but I wonder if running the dish through the rinse cycle and taking it out before it dries would work. If you try this let me know how it goes.
Picture
Picture
Are you seeing this. Look at how wonderfully this worked!!
Excuse the towel underneath my dish. When taking photos the gunky glass dish was blending in with the color of my table so I needed something that would have a better contrast.

Can you see the difference. I am so excited! I told my husband that now we can take dishes to Pot Lucks and not worry that people are judging our food by the look of our foggy-brown glass dishes any more.

I really was super surprised and pleased with how well and fast these dishes cleaned up. Watching as the baking soda paste turned brown grossed me out and made we want to jump for joy at the same time. My back is killing me from this pregnancy but I stayed at the sink on my feet for as long as I could before I had to give up. My back can rest up tonight and then I will finish the job tomorrow.
Picture
This was my first dish that was not quite as bad but look at it now. It looks brand new. I love it!!
2 Comments

How to Clean the Sticky off a Jar

20/2/2014

0 Comments

 
This is one that I have on my main blog, AlwaysBeCreating, but it is a goodie and I just used it so I thought I would share it here. You can find the original post here or I have just re-posted on this site so all my cleaning tips are staying together in one place

I love finding new uses for jars. The hardest part is getting all the sticky off the jar that is left behind when taking the wrapper off. I am here to tell you that there is an easy way to get it off.

All you need is baking soda and some kind of cooking oil. For the second step I used dish soap and a simple dish sponge.
Picture
FIRST: Wash out the jar and take off as much of the label as will come off. This will make it so you only have to clean the sticky off once and not have to fight the paper label.

I mixed equal parts baking soda and oil then rubbed the mixture all over the jar. If exploring the Internet has taught me anything, it is that baking soda can clean most anything. The oil helps spread it on the jar.
Let the jars set for about 10-20 minutes.
Picture
SECOND: Put a bit of soap on the jar and use the sponge with a bit of water to wash off the paste. The sponge helps rub the sticky off and the soap is to clean the oil from the jar.
Now spray the lids some fun colors and use them How ever you would like. ENJOY!!
Picture
0 Comments

A Spotless Microwave in 15 Minutes

13/2/2014

2 Comments

 
Do I ever have a great one for you today. How long do you usually put into cleaning your microwave and how clean do you get it. Do you usually stop at 'clean enough?'

Today we are talking about how to clean the microwave and, as always, how to spend as little time as possible doing it. The hard thing about this year long challenge that I did not take into account is that I would be showing you just how bad things get around here, sometimes on purpose so I have a good before and ofter photo but that is not always the case.
What you will need
Microwave safe bowl or cup
1 Cup water
Either lemons/lemon juice, vinegar or baking soda
Rag or sponge
Cleaning gloves {optional}
Microwave
Picture
First do a quick wipe down inside the microwave. This will get all the loose crumbs out of there so you can focus on the grease and grim.

In the microwave safe dish, I used a glass measuring cup, add one cup water and about 3-4 Tbls lemon juice {or fresh lemon wedges}. You could substitute  this will a cup of vinegar or 3-4 Tbls baking soda.

Place it in the microwave for 3-5 minutes, this will depend on the strength of your microwave but it needs to be long enough that the water will boil. Mine was set for 5 minutes because we had a couple of things overflow and it has been a while since the last deep clean. As the water boils the steam mixture will attach onto the grease and gunk and loosen it right up. The acid in the lemon juice or vinegar will also help to disinfect.  
Picture
After the time is up let it sit for a few minutes {5-10}. Go grab yourself a snack or just sit and read a couple pages in your book of the month. I went had myself a yogurt then did a row or two in the blanket I am crocheting for Lady #2.

Now to simply wipe out the microwave and watch in amazement as EVERYTHING comes right off. Remember, you just boiled the water, even after sitting for a few minutes it is still going to be super hot, so use caution. Use the rag or sponge and get it wet using the water mixture that just came out of the microwave to wipe down the inside. At the very end I wiped it down with just warm water to get any excuse lemon juice residue off.

That is it, it is really that easy. This time I used lemon juice and it worked GREAT! Seriously from start to finish, getting everything out and cleaning out the rag and sponge, it took me 15 minutes and NO SCRUBBING was involved. Go ahead and make a mess in your microwave so you can try out this cleaning tip and see how easy it is for yourself.

I did not want to deal with the fumes from boiling the vinegar like I did when I cleaned the drip pans and I need some more baking soda but when I get around to testing these other two options out, I will let you know.
Picture
I did not want to show the close ups of the before because of how bad things really were in there but that is really the best way for me to show you how wonderful this little trick is. I am still so pleased with myself every time I go to use the microwave and see the shinny white inside.
Picture
Picture
2 Comments

Cleaning the Drip Pans on the Stove

1/1/2014

2 Comments

 
I love the idea behind the drip pans for stoves. They catch everything that falls or over flows from cooking to keep it {most of it} from getting into the far reaches of stove top and oven. But then that dreaded day comes when it is time to clean them or buy new ones {you can find some reasonably priced ones online}.

I did a bit of looking around and found a number of websites with suggestions. There were a load of different tips and techniques but since I am pregnant and we don't have a dishwasher in our apartments, I opted for a nonchemical approach and one that would seem to require to least amount of scrubbing.
Picture
Remove the drip pans by following the manufactures instructions and start by simply wiping them off with a wet cloth to get the loose stuff off.

In a large pot mix 2 parts water and one part vinegar {make sure there is enough in there to sufficiently cover the drip pans} and boil for 30 minutes, it may require more time if is some stubborn build up on your drip pan. We ended up having to open a couple of windows for a few minutes to air out the apartment.

When that is done place the drip pans in soapy water and wash off anything that didn't come off while they were boiled. I was surprised at how easy it was to just wash them clean with very little scrubbing or time.

You can find the original post in this thread.
Picture
I was not done here! To help plan ahead for our upcoming move and because I want things to be as easy as possible since I will have a new born {literally, weeks old} I added a couple of steps.

Now cover the drip pans in aluminum foil. When it is time to do our deep clean for moving day I can simply take off the foil and toss....Um, that's awesome! I have to thank my mom for that tip. I remember her doing this when I was younger and there were six kids at home. Another option is buying drop-ins that you place in the drip pan.
Picture
Since I was in a cleaning mood and there's no reason to only do half of the stove top, I continued.

Still looking to put in the least amount of effort and time on my end. I went to my cleaning bucket and  decided on the toilet bowl cleaner {it sounds weird but it was a new bottle so I thought, what the heck, why not try it?} Just squirt it around the rim or anywhere that is greasy and looks like it needs a good cleaning. I walked away for about 10-20 minutes and when I came back everything basically wiped off. Use a sponge and warm water and watch it all come right up.
Picture
Last is underneath the stove top. Did you know that most electric stove tops pop up so that they can be cleaned underneath? Now you do! My husband had already put down aluminum foil when we first moved in, so I simply tossed it out, wiped inside and placed new foil.
Picture
Done and Done!!!!
Picture
Here are some of the other sites I looked at for tips on cleaning drip pans.
Spot cleaning to deep cleaning.
Using the self cleaning in the oven.
You could try WD-40.
Or there is Ammonia.

And a gem on what did not work for one lady.

When I am not pregnant and have warmer weather to leave the windows open all day I really want to try using Ammonia. I read about so many people who said it was SO easy and simple, no scrubbing at all. When I get to it, I'll let you know.
2 Comments

    Author

    Write something about yourself. No need to be fancy, just an overview.

    Archives

    January 2015
    October 2014
    April 2014
    March 2014
    February 2014
    January 2014

    Categories

    All
    2014
    Baby
    Bathroom
    Cards
    Carpet
    Cleaning Tips
    Cleaning Tips
    Crayon
    Family
    Floor
    Glass
    Happy Birthday
    Holiday
    Homemade Cleaning Solution
    Invitations
    Kitchen
    Nail Polish
    Review
    Sink
    Thank You
    Thinking Of You
    Toys
    Valentine
    Window

    RSS Feed


Powered by Create your own unique website with customizable templates.