49Fifty
  • Home
  • Photo Gallery
  • 2015 Project
  • 2014 Project
  • Blog

Nail Polish on Berber Carpet

30/1/2014

0 Comments

 
RED!! Are you kidding me?! Red nail polish on the carpet. Red crayon, red pen and now red nail polish.

Obviously this cleaning tip came about from necessity just a couple of days ago. Lady A and I were painting each others nails and she got RED nail polish on the carpet!! Red anything always seems to smear whenever you have to clean it up. My first reaction was to take nail polish remover to it - as expected, that smeared it everywhere.

I went to my bucket of cleaning supplies and grabbed the Scrubbing Bubbles with Bleach and a soft bristle brush. I was not worried about the bleach because the carpet consists of man-made synthetic fibers and with a soft bristle bush on Berber carpet it would not mat as I brush the cleaner around on the carpet.
Picture
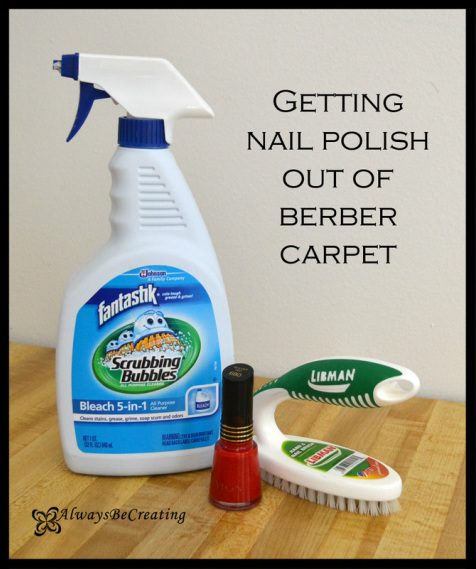
ACT FAST!!! This is key, the nail polish was still wet while I was trying to clean it.
Spray the Scrubbing Bubbles right on the nail polish and then scrub in a circular motion with the brush.
I am not going to lie, I thought we were toast, but after just a few minutes of scrubbing the stain was gone. I mean, ALL the way gone!!! If I wasn't so large from pregnancy I would have jumped up and done a happy dance.

Now spray with a water bottle and blot dry. This will help bring up the chemical from the cleaner that are in the carpet.

Do's:
Act as soon as you notice it. The longer it is on the carpet the more it will set in.
If you have a second try the cleaner on a spot of carpet that is out of sight to make sure that it is color safe.

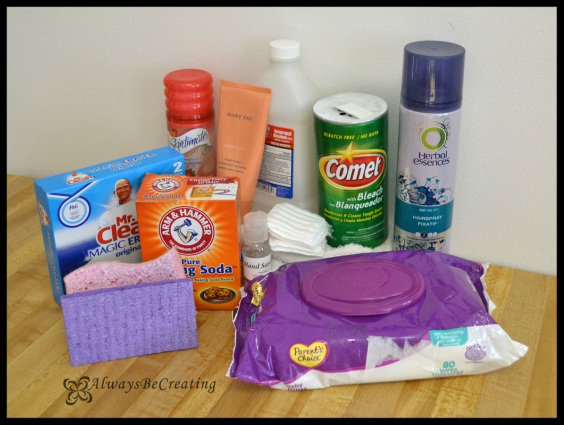
Because I know not everyone is renting and has nasty berber carpet on their floor, I have also put together a list of tips from others who have had great success with other cleaners.
  • Stuff you might already have at home like window cleaner.
  • Would you dare cut your carpet if it didn't all come out?
  • Dried nail polish, here is a list from moms who have tried different things like Oops, Sol-U-Mel and other cleaners.
The number one item I saw used was rubbing alcohol and most swore by it's magic, saying that it removed most, if not all of the nail polish.
0 Comments

Lady A Valentine Cards

29/1/2014

0 Comments

 
Glow rings and suckers!

Instead of waiting until the last minute, when Valentine Cards would be on sale for 70% off, I decided to do homemade cards for Lady A's friends. These kids are all toddler age so the cards needed to have something that would minimize the sticky mess mom and dad would have to clean up. I am so excited about how cute these turned out and they were super easy.
Picture
You'll need cardstock in four different coordinating colors.
Color one: cut the 8 1/2"x11" into four equal pieces {4 1/4"x5 1/2"}
Color two: cut into pieces 4"x5 1/4"
Color three: Print then cut 3 3/4"x2 1/2 Download the PDF here.
Color four:
4 1/4"x2 1/2"
Picture
With the pieces printed and cut it is time to get fourth piece ready for the suckers and rings.
Fold right sides together 1 1/2" from top then repeat from bottom. Fold in half in the opposite direction.
Place a hole, big enough to fit your item, between the top and center folds, repeat for bottom hole.
Note: Cardstock can be hard to fold and make sure that the crease ends up in the right place. I simply placed a ruler where I wanted the crease to be then took an orange peeler {anything with a solid corner will work} and ran it down the side of the ruler.
I used a nifty little setter kit that my mother-in-law got me from Provo Craft. It has three different hole punch sizes and two of them worked perfect for this project.
Picture
Now layer and glue everything together. You could add brads, chalk, ribbon or any other embellishments that you would like. I had Lady A do finger print hearts since she is still a bit little to write her name. If your toddler is anything like mine, there will be extra finger prints too, this just adds to the handmade feel. I would suggest keeping a wet wipe or paper towel handy to clean up any messes that happen.
Picture
0 Comments

Toddler Wall Art

23/1/2014

0 Comments

 
We have had our first experience with cave drawings {toddler art} on our walls. There is crayon and ball point pen. My initial reaction was to gasp and wonder how long it has all been there, then to talk to her about why we do not draw on the wall but at the same time it is another milestone. Lady A is exploring her creative side and where better to do that than a big white wall. It is a blank canvas! How can I be too upset with her as she is learning, growing and exploring all that she can do.

To clean the crayon {which is also a red, one of the hardest colors to clean up} I did a little bit of searching for tips on what others have tried.

This site has a long list of different ideas. I do not have enough crayon on the wall to try them all out so I went with what I had on hand and what I felt would work best.

The two most important suggestions are act fast and try a test spot on the wall first. The longer the color sits on the wall the more it can soak into the paint which will require more scrubbing and lead to removing paint. Test the solution you are going to try on part of the wall that is behind a piece of furniture, a frame or art piece on the wall or in a discrete area.
Picture
Supplies
I tried all these that I had around the house. The baby wipes took off top layer or the crayon but also smeared the color. Then I tried the hand lotion, shaving cream, hair spray baking soda and hand sanitizer. They all worked pretty well at taking the top bulk of the crayon off but still left color behind.

Here is what I ended up doing. First clean with Lysol wipes or Comet on a damp sponge. {The Comet I had on hand had bleach in it, which actually worked well to help clean the white walls.} This will take most of the crayon color and wax off. Then place rubbing alcohol on a rag or cotton square. I quickly rubbed it over the crayon or ink then when back over it with a bit of elbow grease. Be careful not to scrub too hard or to let the wall get too wet with the rubbing alcohol, it can bring up the paint.

I will say that I was super excited with how well the crayon and ink came up with the rubbing alcohol. I can only imagine how well it would work if I had caught it all when Lady A first marked up the walls.
Picture
Crayon
Picture
Pen Ink
Here is a link for ideas on cleaning toddler cave drawings from wall paper. Keep in mind that it is wall PAPER so if it gets too damp, the color and paper can rub off as you are trying to rub off the ink.

The Mr. Clean Magic Eraser is always a go to for things like this. Be sure to take care when using this, too much rubbing will lift the paint from the wall. Which ever method you go with, act fast! Part of me wonders if some of the other techniques would have worked if I had noticed the drawings and cleaned them up right after Lady A had left them.

Other sites I looked up are Suite101, SiimplyStated and Hub Pages.
0 Comments

Happy Birthday

22/1/2014

0 Comments

 
My cousin and her family have moved out of the country for her husbands work. We used to talk all the time, some of those phone calls would last hours. It didn't matter how short we were planning on making the call, we could always find something to talk about. Phone calls are not so easy now, are are in completely opposite timezones, but I want to keep in touch with her and let her know that I am thinking of her.

She is a very gifted quilter, one of my favorite quilts is one that she made for me as a gift when I came home from my mission. The cover of the card is designed after the Log Cabin pattern.
Picture
Picture
0 Comments

Cleaning Bathtub Toys

16/1/2014

0 Comments

 
I have never thought about cleaning bathtub toys....they sit in the clean water with the kiddos....but I noticed a little build up on some of Lady A's bath toys so it is time to get working on cleaning them. After all they are in the bath to get clean, it does not make sense to have them play with dirty toys.

Plug the holes for those that squirt water or have squeek holes. The kiddos might not be too happy about this but it will save you a lot of work and mold in the long run. Simply use hot glue to place a water proof seal on those toys.

Here are a couple of options to cleaning those toys that can help keep bath time a little bit easier:
  • Boil them ~ place them in a pot of water and boil them in hot water. Squeeze the water in and out of the squirt and squeaky toys to get the yucky mold out.
  • Place in bleach or vinegar bath ~ The bleach kills mold but if that seems a bit harsh you can use vinegar instead. Mix about 3/4 C. bleach {vinegar} with 1 gallon of water.
    • Let the toys soak for 5-10 minutes {or overnight if they need a little extra attention} making sure that any of the squirt and squeaky toys get some of the water mixture in them to clean the inside of them as well.
    • Squeeze them a number of times to work out the yucky.
    • Rinse in hot water and allow to completely dry, this would be a good time to plug up the squeeze toys if you want to.
  • Place them in the dishwasher. Make sure to place them on the top shelf and only place those that you are sure can handle it. The dishwasher will sanitize them and help to kill any mold or other gunk both on the inside and out.
Picture
Just a couple of thoughts....
  • If the inside of the toy is too gunky just throw it away and get a new one. The health of our little ones is not worth trying to save a couple of bucks.
  • Be sure to take the toys out of the tub after every bath. Allowing them to fully dry in between baths will help keep the gunk from moisture loving mold to build up.
  • Normally if it is plastic and will stand up to water I would let Lady A take it in the tub with her. From now on I will make sure to have certain toys set a side so I don't have to deep clean all of them and they will be ones that I would be fine to toss if/when they need to be.
  • If you need to, use a soft brush to help clean the toys.
Picture
0 Comments

A Thank You

15/1/2014

0 Comments

 
Growing up we had some neighbors that we loved. One summer I spent everyday babysitting their little girl and I loved every day of it. We lost touch over the years after they moved. BUT...thanks to the small world of Facebook we have been able to reconnect and keep in touch.

Since we have moved out to the East Coast she has been generous enough to share her buddy passes with us so that we could go home for the holidays a couple of times, our niece and nephew came to visit and to help get everyone home for a family funeral. Here is what I came up with. I looked at the JetBlue Website to get a couple of ideas, this is where the color scheme come from, and this is what I came up with.
Picture
If I were to ask her about what kind of gift card I could get her to say thanks, she would tell me not to worry about it. Any old gift card would not do, I wanted to make sure it was one that she would actually use so I asked her daughter and she gave me some great ideas. On the inside I made a card slot to place the gift card.
Picture
0 Comments

Homemade Window and Glass Cleaner

8/1/2014

0 Comments

 
Temperatures are freezing cold one day and the next you just need a sweater.

To help us save what we can on heating {because it is so expensive out here} we are going to put the clear plastic over the drafty windows. But first I need to make sure those windows are clean! How glum would that be to look out dirty windows trapped behind plastic until Spring?

All window and glass cleaning solutions that I have heard about growing up and read on the internet are escensially the same

Basic:
Water and Vinegar
Variables: Dish Soap, Cornstarch, Rubbing Alcohol and essential oils to cover up the vinegar smell

I found that this solution works best for me
  • 2 C. Hot water
  • abt. 1/4 C. Vinegar
  • 1 Tablespoon Cornstarch
  • 1 teaspsoon Dish soap *optional {best used on the outside where you can spray off the excess suds with water}
Start by mixing the first three ingredients together. Pour into a spray bottle and go to town.

Don't judge me by my windows, only after you see how great and clean they can get.

I tried my best to get a photo of my dirty kitchen windows after Lady A helps me with dishes. Can you see the huge difference that made. I made a second batch of cleaner to do the outside {our windows fold in so I can wash the outside while staying inside}. You can see the little bit of green on the trees and everything looks more crisp from the clean windows.
Picture
For outside windows add dish soap to the mix. Do not shake or you will have to wait for the bubble to go down before pouring into a spray bottle, unless using in a bucket with a sponge or squeegee. Increase the amount of solution as needed to cover all windows. After washing rinse off with water...then stand back and admire just how clean they are!!!
0 Comments

Thinking of You ~Aunt Grace

8/1/2014

0 Comments

 
My Grandma had some of the sweetest sisters there ever where. Aunt Ivie, Aunt Grace and my Grandma all had the same sweet personalities. They loved unconditionally and where always there with open arms.

Once, after recently getting my drivers license, I had the chance to drive my Grandma, Grandpa, Aunt Ivie and Uncle Max out to an event. Honestly, I can not remember for the life of me what it was, possibly a wedding reception, but I do remember meeting a lot of family from Aunt Ivie and Uncle Max's family. I still have the letter my Aunt sent to my Grandparents thanking them for coming and there was a bit in there for me. Oh man, I felt so special that she thought of me and she had such nice things to say.

Christmas time of 2012 I got to see my Aunt Grace again when she came out for my Grandma's funeral. This past Holiday season she has been on my mind a lot and I don't want to miss the chance to tell her I am thinking of her and that I love her.
Picture
Did you ever get 'the ultimate scarpbook and card kit' by Lisa&Becky? I've had mine for a few years and love it. Over the years I have added different items to my kit so that everything I need it right where I need it.
Picture
0 Comments

Happy New Year

1/1/2014

0 Comments

 
Picture
This is a New Family Tradition that came about from procrastination and not getting Christmas cards out on time.

Full article here.

0 Comments

Cleaning the Drip Pans on the Stove

1/1/2014

2 Comments

 
I love the idea behind the drip pans for stoves. They catch everything that falls or over flows from cooking to keep it {most of it} from getting into the far reaches of stove top and oven. But then that dreaded day comes when it is time to clean them or buy new ones {you can find some reasonably priced ones online}.

I did a bit of looking around and found a number of websites with suggestions. There were a load of different tips and techniques but since I am pregnant and we don't have a dishwasher in our apartments, I opted for a nonchemical approach and one that would seem to require to least amount of scrubbing.
Picture
Remove the drip pans by following the manufactures instructions and start by simply wiping them off with a wet cloth to get the loose stuff off.

In a large pot mix 2 parts water and one part vinegar {make sure there is enough in there to sufficiently cover the drip pans} and boil for 30 minutes, it may require more time if is some stubborn build up on your drip pan. We ended up having to open a couple of windows for a few minutes to air out the apartment.

When that is done place the drip pans in soapy water and wash off anything that didn't come off while they were boiled. I was surprised at how easy it was to just wash them clean with very little scrubbing or time.

You can find the original post in this thread.
Picture
I was not done here! To help plan ahead for our upcoming move and because I want things to be as easy as possible since I will have a new born {literally, weeks old} I added a couple of steps.

Now cover the drip pans in aluminum foil. When it is time to do our deep clean for moving day I can simply take off the foil and toss....Um, that's awesome! I have to thank my mom for that tip. I remember her doing this when I was younger and there were six kids at home. Another option is buying drop-ins that you place in the drip pan.
Picture
Since I was in a cleaning mood and there's no reason to only do half of the stove top, I continued.

Still looking to put in the least amount of effort and time on my end. I went to my cleaning bucket and  decided on the toilet bowl cleaner {it sounds weird but it was a new bottle so I thought, what the heck, why not try it?} Just squirt it around the rim or anywhere that is greasy and looks like it needs a good cleaning. I walked away for about 10-20 minutes and when I came back everything basically wiped off. Use a sponge and warm water and watch it all come right up.
Picture
Last is underneath the stove top. Did you know that most electric stove tops pop up so that they can be cleaned underneath? Now you do! My husband had already put down aluminum foil when we first moved in, so I simply tossed it out, wiped inside and placed new foil.
Picture
Done and Done!!!!
Picture
Here are some of the other sites I looked at for tips on cleaning drip pans.
Spot cleaning to deep cleaning.
Using the self cleaning in the oven.
You could try WD-40.
Or there is Ammonia.

And a gem on what did not work for one lady.

When I am not pregnant and have warmer weather to leave the windows open all day I really want to try using Ammonia. I read about so many people who said it was SO easy and simple, no scrubbing at all. When I get to it, I'll let you know.
2 Comments

    Author

    Write something about yourself. No need to be fancy, just an overview.

    Archives

    January 2015
    October 2014
    April 2014
    March 2014
    February 2014
    January 2014

    Categories

    All
    2014
    Baby
    Bathroom
    Cards
    Carpet
    Cleaning Tips
    Cleaning Tips
    Crayon
    Family
    Floor
    Glass
    Happy Birthday
    Holiday
    Homemade Cleaning Solution
    Invitations
    Kitchen
    Nail Polish
    Review
    Sink
    Thank You
    Thinking Of You
    Toys
    Valentine
    Window

    RSS Feed


Powered by Create your own unique website with customizable templates.